Showing posts with label diy. Show all posts

Thursday, August 23, 2012

Halloween Mash Up

Here are a few Halloween ideas that I plan on trying. A great mash up of some cute diy projects I found on Pinterest and blogs. Enjoy!


Wreaths


Black Tulle Wreath from Something To Do

I also really like adding a background to it.
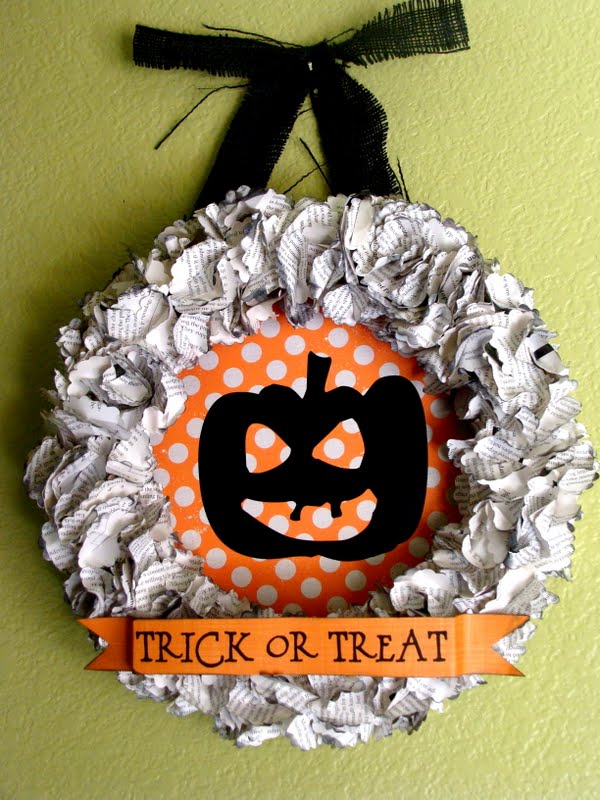
Lil' Luna added a background on their Trick or Treat wreath. I like using a silhouette in the center. Maybe actually cut it out like a jack-o-lantern? Either way, I must make a wreath in the beginning of October to start off the festivities!

Centerpiece

I've scoured the Internet for ideas. Mine is going to be some kind of mad scientist like mix of these great centerpieces.

The House of Smiths does a cute creepy candy display. I really want to incorporate Halloween candy to munch on!

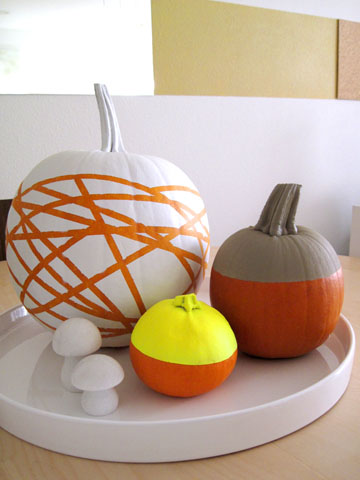
These painted pumpkins from Happy Mundane are awesomely non traditional but festive. Carved pumpkins are a "tradition" Mr. P and I started last year and we'll definitely have some glowing outside. I'd like painted ones to put on the table. I'm afraid the kitties will destroy and/or eat any carved pumpkins in the house.


Wine Bottle Decor

I have a few wine bottles cluttering up my kitchen window. I think these are just adorable. The vampire and ghosts will look cute in the kitchen! This particular one was found on Woman's Day.

I also found another style of ghost bottle that was made with the frost spray paint. I like that idea to use as a base with these cute faces!

Candles

Halloween must include some kind of candle illumination. While searching for Halloween decor in general I have come across a few ideas involving tights and pantyhose being cut and used to wrap around pumpkins and jars alike. Stashed in my diy board on Pinterest is this idea of spray painting over lace to leave the design.

Look how pretty! From Roadkill Rescue

I think combining the pantyhose trick over a candle holder and spray painting it would be awesome. I got the inspiration from these votive holders from Shelterness.


I know I will be able to find some interesting patterned tights at the store!
 

Garland

 I love garland. I think it makes anything instantly festive. There's so many kinds you can buy. I always end up getting the cheap-o foil and wire variety for outdoors. I want to make my own for inside. These two scream cute and Halloween.
 
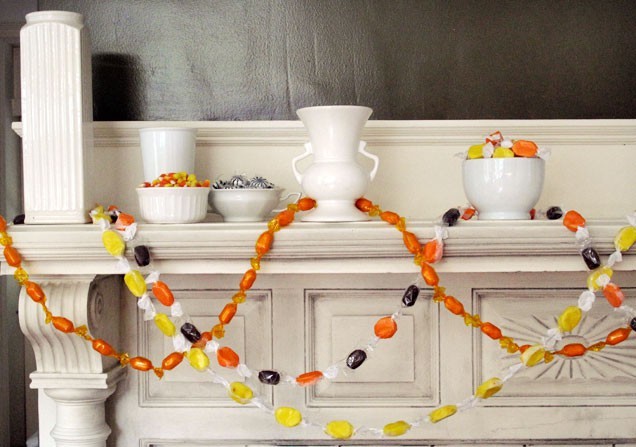
Let's be honest, any garland making is going to be time consuming. Tying or gluing tiny objects onto string doesn't sound as appealing as it ends up looking! Buying a bag of the cheap variety candy and still achieving the same results sounds like a plan to me! iVillage inspired this one. Simply staple them together!
 
 
The pom garland is adorable. This one requires more effort than stapling, but Paper Source gives you a wonderful PDF tutorial that is super easy to follow. I can't wait to try this one out! Also, save the idea for other holidays and events!
 
 
What are you planning for Halloween?


Saturday, August 11, 2012

Craft Fail!

I thought it would be fun to include a crafting fail every now and again. Sometimes things don't work out the way you planned.

 This is the picture that had caught my eye. They look amazing. The blog it took me to is quite awesome. Juicy Bits! I read the tutorial she followed. She did an amazing job on these, after the time I took on mine (which obviously didn't work out) I knew it involved patience and skill.


I got my supplies ready.


I was going to make mine two-toned. I made sure to not blow up the balloon too big.


Made the mixture, here's one of the yarn strips.


Started wrapping them. Realized I think I still had a bigger balloon for the amount of yarn I cut. I didn't mind it being more sparse.


I hung them from skewers off my bookcase. Floor was covered, I was ready to let these dry!
So the next day they were fully dry. I popped the balloon and let it slowly leak. I left the room to do some kind of housework in the meantime. I had come back to Cecil cat playing with parts of the orange one and the yellow laying on the floor crunched. Balloon deflated as well my dreams.


So this is how mine turned out...


I'm going to try these again. No kitties allowed, more yarn, and probably a better glue mixture; will allow for an outcome closer to the inspiration! Better luck next time!


Feel free to send in some of your fails. Post them on Domesticult's FB page!


Thursday, August 9, 2012

Handmade Spice/Herb Bottle Gift Idea

J's Birthday was on the 7th. I shall not disclose her age. Since I can remember J has always liked to cook. I remember when we were teenagers she would cook us meals. We would also make each other gifts and cards for just about any occasion or holiday. Diy toe socks were one of my favorites!

I thought it would be nice to do that for her again. I found the bottles and blank cards at A.C Moore. The bottles have, as J said, "An apothecary feel." Everything else I already had in the recent craft stash I have created. Use any scrapbooking paper or any type of paper of your choosing! You may need to buy the spices/herbs you use for your gift. I made a set of two and thought it might be cool to make her more through out the holiday season that's coming up. :p Guess she'll know now?!

Handmade Spice and Herb Bottle Gift Set


Supplies:

For the Vessels/Bottles:

  • 2 glass jars/bottles/containers in the size and shape of your choosing! I loved the ones I found!
  • Mod Podge
  • Elmer's Glue All
  • Clear Acrylic Sealer
  • Scrap paper (I used paper from a scrapbook packet that shared the same scheme)
  • Ribbon
  • Scissors
  • Ruler/Measuring mat
  • Letter stickers or if you have nice handwriting do it yourself! You can always leave a blank box for them to write on if you choose to just give an empty set to store their already owned spices!
Directions:

     1.  Measure and cut your background paper to fit around the circumference of your container. Make it about about a 1/2in. longer so you can glue it together on the overlap. Also cut smaller placards of other patterned paper to place your letters/write on. Really easy, just cut out strips and squares to fit your jar size.

     2.  I made a thin layer of Glue All on the back of the background label and wrapped around, be careful and even when wrapping around. Have your 1/2inch overlap seal over. Let dry.

     3.  At this time I used my letter stickers to label the smaller placards I cut. Once background is dry, another thin layer of Glue All on backs of placards and place on front of bottle. Easy! Let dry.

     4.  Once dried again apply a thin layer of Mod Podge over entire label and slightly off edges. I didn't cover the whole bottle with Mod Podge, I didn't want that texture on all of it. Let this completely dry and have tops sealed and covered when giving labels a light spritz of Sealer.

     5.  Cut some ribbon that will make a bow on the necks of the bottles. Or around if you chose a different shape! Don't tie till dry and filled.

Meanwhile during all that drying time, I made the card too. You can always use card stock or cardboard you have on hand to make your base card. I just glue-all'd and mod podged' measured squares of the matching paper for the card. Be creative! I'm still working on pretty penmanship, until then I use stickers or stamps! I didn't give a tutorial for this, mine isn't anything crazy fancy. I liked matching the layered paper to the bottles and added dimension to the card with a bow!

The hard part is over!
I chose chives and a sugar and spice mix to give her! I have an organic chive plant. So, I just cut some fresh chives and added to the bottle! I used this Sugar and Spice Blend recipe as a base. I did change a few things. I didn't add paprika, I substituted with some pumpkin spice blend and a little more ginger. Mmmmm. She really liked it!


Friday, August 3, 2012

Serving it up DIY style.

I'd like to start straight off and tell everyone that Food and Hearts by J will be featured Sunday night! Tomorrow night is actually J's Birthday celebrations, so we'll be a little busy having fun and all.

Mr. P tempted me away from writing this post last night with homemade burgers and a zombie flick. I just couldn't resist. But without further ado, the revamped serving tray I've talked about for days!


Serving Tray Make-Over

Finished Product!


Supplies:

  • Old book/magazines/newspaper
  • Variety of paint swatches (free!)  or bits of paper to fill in your cut out.
  • Brown paper lunch bag
  • Glue stick
  • Mod Podge
  • Craft spray sealer/acrylic sealant
  • Scissors
  • Paint (I used acrylic in my color scheme)
  • Serving tray (Mine was given to me and had one of those wine bottle paintings that I'm not fond of, on it.)
  • A stencil (or I just drew my tree free-handed and cut it out with the exacto knife!)
  • x-acto knife
  • (Optional) Glass panel/pane to place into tray. I had three 5x7 panels from the picture frames I bought for my canvas quotes. I suppose this would not be good if you have small children, you'd probably want a piece that would fit the exact tray size! Children hands on loose glass sounds like a bad idea to me!

Directions:

     1. Fit book pages and secure to bottom of tray. I used a light coat of mod podge.

I had realized I covered most the tray and didn't take a before picture!


     2. Trace your stencil on a cut at seams paper lunch bag. Cut out shape with x-acto knife to leave a good cut out for background. I then gave the bag a rounded shape and snipped and trimmed it to my size.

     3. Attach paint swatches to use as background of your cut out. Overlap and secure with glue stick.


     4. Place paper bag cut out on top of swatches. The paper bag will pucker very easily, make sure to use a thin layer of mod podge on back of paper to get a good grip to the swatches and book pages.


     5. Using your paints begin to make a coat around bag cut out, on the book pages. I made sure to make thin enough layers for the type to be somewhat seen. I then painted the paper bag in a cafe brown. I probably did that backwards, but paint it however you want!


     6. After seeing above picture, I felt the inside with the black frame was too stark. I decided to only paint the inside of the tray handles/edges the corresponding green to liven it up. I also did rough brush strokes to make it more textured and rough looking. Some of the black can obviously be seen through, giving it a slightly aged effect. Or sandpaper it later if you want it more distressed! After all this, let the paint dry!


     7. Make your first layer of mod podge over entire bottom. I did three coats total, leaving drying time between all!


     8. After last coat of the podge is dried, apply your sealer. And you're pretty much done! I placed my glass panels to cover the center/tree of the tray so things would be a little more protected.


This whole piece was really inspired by the painting I bought by Rafi Perez. I'm actually going to buy another piece by him this weekend to balance out my living room. It's basically the one piece I found that I knew, "Ok, now I know exactly what I want the room to look like!" A muse for my home! Thanks man!


Check out his work on his FB page. Rafi was Here Studio

And his other half, Klee, makes some amazing jewelry, Jewelry by Klee.

You should check them out!

Don't forget Sunday night is the first monthly post of Food&Hearts by J! Blueberry Soda...yum!


Sunday, July 29, 2012

Grilled Goods and Home Decor


The girls got together this month for grilled goods and home decor. Mr.P and I are officially in our new place.

It was really hard to narrow down the choices, we all pinned so many yummy grilled foods. Two kabob/skewer ideas were used and I'm so glad we chose "skewed" food!  It rained all day Tuesday. I don't have a covered porch. Broke out the George Foreman. Super easy to make these kabobs on an electric grill. Not all was lost!


These were awesome. I'm a big fan of kielbasa. Adding the apple was genius.


The basting sauce really soaks into this and is great to munch on. We added the cherries for color and even more sweetness.


Here's some of the spread including the carrots. I would have liked the carrots more if made on a real grill. They were still really good though! We also made an oven version of some foil packet Grilled Garlic Potatoes. We loaded ours with extra cheese and smothered it in ranch afterwards instead of the recommended sour cream! I didn't get a picture since they took forever in the oven. We ate those long after the grilled food was demolished.


We used peanut butter/chocolate chip mix, almonds, and coconut to ours. Popped in the oven instead and they still came out AWESOME. Seriously, I could have ate a whole bunch by myself! Really good idea. I've even thought of other "toppings" to add. I think a "Banana Split" boat; adding cherries, chocolate, pineapple, and butterscotch would be amazing.


Home Decor Projects!

Two of us decided to do this really cool idea involving vinyl letter "stickers", scrap book paper/paper in general, paint and mod podge. Click the link for the tutorial. I read her comments to find out that you can find these letters at any Wal-mart where the poster board/science fair supplies are. Found mine there too!


I used my favorite Vonnegut quote. I used an old paperback I was going to donate/give away. I felt like I was doing something incredibly wrong as I ripped the pages out!


She made hers using scrap cardboard and scrapbook paper. I liked how she made it two toned! The color of paint she used made it shimmer and almost look coppery.


This is a great idea. I'll definitely be making some soon to hang from the trees in my yard since I don't have anywhere else to hang them! She used the cheap-o glow in the dark plastic beads that came in a plastic pack for like $2 from Wal-Mart. It looks awesome hanging from her porch!


Until next time! <3


Saturday, July 21, 2012

Upcycled Pinboard

I work at a bakery/restaurant and many things get thrown out. The bakers were throwing away two large cake pans because they were starting to leak out the sides. Obviously, these can no longer be used for baking but I couldn't just sit there and watch them be thrown away. I decided to turn one into a pinboard for my new craft room! I'm still deciding what to do with the other one.

Everything I used I had on hand. If you already have a fully stocked craft room, then I would suggest you use stuffing or padding inside yours, otherwise just do what I did!


Upcycled Pinboard from Cake Pan

Supplies:

  • 1 old cake pan
  • 1 piece of cardboard ( I used a box leftover from moving.)
  • Fabric, enough to fit your pan size
  • Ribbon
  • Leftover/extra yarn or padding/stuffing
  • Elmer's Glue All
  • Staple gun/stapler
  • Scissors
  • Measuring Tape
  • Electric screwdriver or drill (if using electric screwdrive make sure to use a pointed tipped screw just so you won't damage your bit)
  • Paint of your choice.

Directions:

  1. Measure and cut cardboard to size of cake pan. (Mine was around 13X18)
Cecil cat had to play with the scraps!

      2. I glued yard haphazardly on mine so it would looks more "stuffy" and textured. If you want it to be completely smooth I would use actual padding/stuffing. I also have, no kidding, 5 bags of yarn. Most I know I will never use to actually crochet with, so I might as well find some kind of uses for it.


     3. Allow glue to dry. Measure fabric one inch more than board size all around. This allows you to tighten the fabric and attach it to the back. I think I gave myself more than one inch to be honest! Secure fabric with staple gun on corners ( do not do this throughout the center because your staples could show through the other side!) Also secure with glue all.

    
     4. Allow board to dry. Meanwhile, take the cake pan and decide where you want the board to hang from. (if you're using a rectangle, basically vertical or horizontal? If you're using a circle pan, I guess it doesn't matter! haha) Make sure to level and measure your marks for your holes! Using your drill or I used my trusty Black and Decker electric screwdriver and a pointed tipped screw and drilled it through! I live in a rental and don't want to make any large holes in my walls, so I'd rather not hang it up using nails etc. That's where the holes in the pan and ribbon come in. (If you're painting your whole pan, do your painting now to allow to dry before attaching the ribbon hanger.)

Ribbon knotted through pan.

     Push ribbon through a hole and knot it until it can't fit through. Decide how much slack of ribbon you want to hang the board, determining how low it hangs. I gave mine quite a bit! Push ribbon through other hole and knot again until it can't fit through.

     5. I only painted the sides of my pan with a gray because I liked the silver on the inside. I did a quick cover up on sides and allowed the pan to dry.


     6. Meanwhile, after the board is dry I attached ribbon around the corners to make "pockets' to slide things under as well. I used the stapler and again kept it stapled on the very edges out of sight. Once everything is dry, board should fit right into pan and even stay in place. For extra security, or if you're accidently off by a few mm; I glued it down into the pan. Let it sit with some weight on it to dry.


A nice addition to my new craft room. Super easy and can be made with the most minimal of materials.


Tuesday, May 22, 2012

Orange Panna Cotta


Dip Dyeing and Orange Panna Cotta

A girls night of sorts. Some friends and I got together to eat and create. We knew we wanted a dessert and couldn't resist trying something different! It took 4 hours minimum of set time. So be prepared to wait a while for this delicious dessert. We used two seperate recipes for ours. Here's the panna cotta recipe we used as the base and we went with an orange sauce, instead of the earl grey.

Orange Panna Cotta with Orange Sauce

Ingredients:
  • 1 C heavy cream
  • 1/2 C sugar
  • 1/2 C fresh orange juice
  • zest of 2 oranges
  • 1 1/4 C plain yogurt
  • 2 tsp lemon juice
  • scant 1/4 tsp vanilla
  • salt, to taste
  • 1 1/2 tsp gelatin
  • 2 Tb cold water
  • 2 oranges for orange segment garnish
Directions:
  1. Combine the heavy cream, sugar, and orange juice in a saucepan. Zest two oranges into the cream mixture. Heat slowly until the sugar is dissolved. Take off the heat and steep for a half hour.
  2. Strain the cream into a bowl and add the yogurt, lemon juice and vanilla. Whisk thoroughly. Add a small pinch of salt, to taste.


       3.  Sprinkle the gelatin into the water and let bloom for 5 minutes. Melt the gelatin by placing          the bottom of the dish in a pan of simmering water.


        4. Whisk into the panna cotta. Pour into six 4 oz ramekins. Refrigerate for at least 4 hours.


Orange Sauce

Ingredients:

  • 1 C squeezed orange juice
  • 3 Tb sugar
  • 1 Tb butter
  • Julienne orange peel, 1 orange.

Directions:

  1. Place all ingredients into small saucepan. Simmer over medium heat. Stir ocassionally, until thick/syrupy. Around 12-15 minutes. Allow to cool, pop in fridge till ready to use.


This dessert has the most amazing consistancy. The orange flavor makes it very refreshing. I will definitely make this again when I'm willing to wait for it!


The dip dyeing project was a lot of fun. We all had a blast and of course ended up tye dyeing a few things too! We got the basics from Martha Stewarts site. This can get messy but you really just have to be careful and I promise you won't end up dyeing your whole house.


These are officially my favorite beach shorts.